Slicing our models in PrusaSlicer (since version 2.4)
Prusa Slicer is nowadays our preferred method of slicing our models. It’s not limited to Prusa printers only. The same applies to Creality, Anycubic and other brands, usually comming with their own flavour of slicers. If your printer is not listed directly in the Prusa Slicer, you can usually find a Printer profile on the web, usually on printables.com. Use the Print and Filament settings embedded in the stock 3mf files as well as local modifiers to correctly slice the model. Don’t try to print fast, the speed is determined by the material properties. Only part you can speed up are the travel moves.
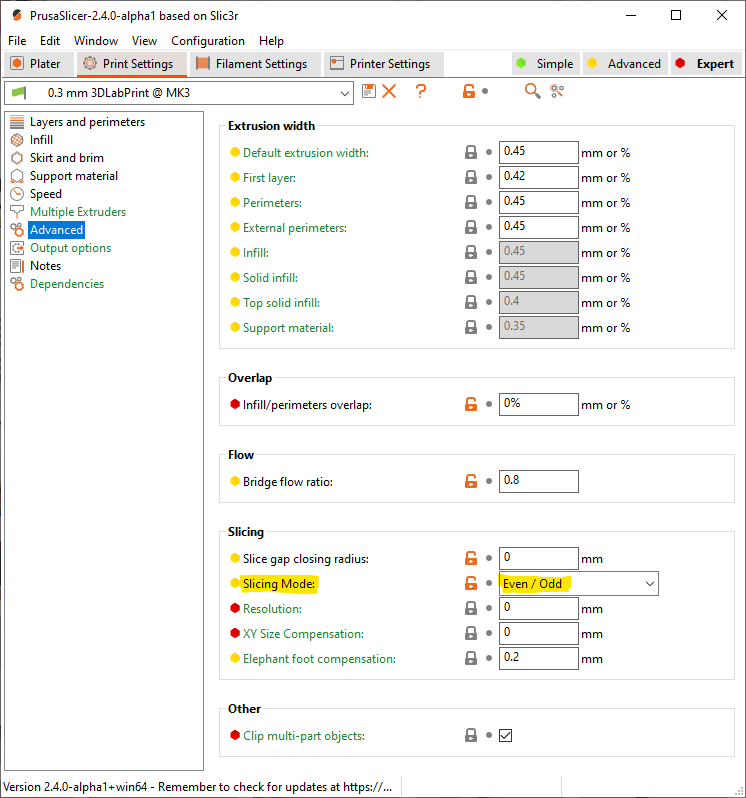
PrusaSlicer developers kindly answered our call for a slicing mode to support printing our thin-wall planes including the internal structures. The slicing mode is called Even/Odd and is available on the Print settings tab / Advanced / Slicing
This feature is supported in PrusaSlicer since version 2.4.0. Get the latest version from prusa3d.com.
PrusaSlicer developers kindly answered our call for a slicing mode to support printing our thin-wall planes including the internal structures. The slicing mode is called Even/Odd and is available on the Print settings tab / Advanced / Slicing
This mode itself doesn’t ensure a successful thin-wall printing but allows to slice the model as designed, with internal structures within fuselage and wings designed to support the walls and create structural integrity of the model.
Thin-wall printing is a very different discipline compared to solid printing (Benchy for example) and we’re not aiming that much on visual quality but other more important parameters for functional, lightweight and strong parts. That’s the reason, your trusted printing profiles will probably be of no use for you and you’ll need to tweak a specific profile for this kind of printing. This guide is to give you some basic knowledge of what you should focus on.
3mf test files for PolyAir (PLA) and PolyLight (LW-PLA)
To aid you we prepared basic profiles with test files to be downloaded below.
- Marlin compatible Direct Drive printer with build volume 200x200x200 mm (tested on Original Prusa MK1 and MK3 printers)
Open the above 3mf files with PrusaSlicer, proceed to the Print Settings and Filament Settings tab and save the configurations. Amend the configurations according to the needs of your printer. Since then you can import STL files into the new project or open our prepared 3mf files where available, and simply choose your own settings from the dropdown menus to slice the models. When importing STL files, you may need to apply some Height range modifiers (please see below).
Print Settings (compared to 0.15 mm Quality)
Coming from stock 0,15mm quality settings let’s go through the list of changes for the Original Prusa MK3 printers if you want to configure the slicing manually:
Layers and Perimeters
- Bottom solid layers: 0
- Top solid layers: 0
- External perimeters first: true
- Layer height: 0.25 mm (0.30 mm for LW)
- Perimeters: 1
- Thick bridges: true
- Perimeter Generator: Classic (not Arachne) since v2.5
Advanced
- Default extrusion width: 0.42 mm
- First layer: 0.44 mm
- Perimeters: 0
- External perimeters: 0
- Bridge flow ratio: 0.8
- Infill/perimeters overlap: 0%
- Slice gap closing radius: 0
- Slicing Mode: Even/Odd
Speed
- Perimeters: 60 mm/s (40 mm/s for LW)
- External perimeters: 70%
- First layer speed: 50%
Skirt and brim
- Minimal filament extrusion: 10 mm
- Skirt height: 1
Support material
- Don’t support bridges: true
Infill
- Infill density: 0%
Filament Settings (compared to General PLA)
Filament
- Bed temperature: 56°C
- First layer bed temperature: 56°C
- Nozzle temperature: 230°C
- First layer nozzle temperature: 230°C
- Diameter: Measure the filament diameter on multiple spots of the spool with digital callipers and insert the average value here. By default, it’s 1.75 mm.
- Extrusion multiplier: 0.9-1.1 by default, adjust according to the resulting weight of the part. Use 0.4 – 0.5 for LW (foaming) filaments.
Cooling
- Keep fan always on: false
- Enable fan if layer print time is below: 10 s
- Max: 50%
- Min: 0%
Filament Overrides
- Retract on layer change: true (false for LW)
- Retraction Length: 0.8 mm (0.01 for LW, values are for Direct Drive extruder)
- Lift Z: 0 mm
- Extra length on restart: 0.04 mm
- Retraction speed: 30 mm/s
- Wipe while retracting: false
Height range modifier
To create a first layer with two perimeters or to close some steep overhangs, you may want to use a modifier. Height range modifier is usually the easiest method to achieve such settings.
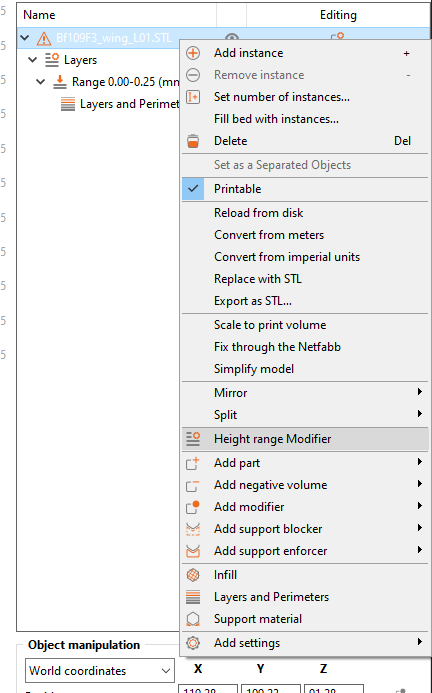
Adjust the range (from 0 to 0.25 for 2 perimeters first layer) and add a feature Layers and Perimeters and set different Bottom/Perimeters/Top count effective only for a selected range.